本文主要介绍Hexo博客分别在Google和百度的seo优化方法。
添加sitemap
安装插件
需要安装两个插件来生成 sitemap 文件,前一个是传统的 sitemap,后一个是百度的 sitemap。
npm install hexo-generator-sitemap --save
npm install hexo-generator-baidu-sitemap --save
修改站点配置文件
将sitemap文件添加到站点配置文件_config.yml中,并修改url字段的值,其值默认为http://yoursite.com。
sitemap:
  path: sitemap.xml
baidusitemap:
  path: baidusitemap.xml

url: https://blog.fightingtop.cn
安装完成后执行hexo g即会在站点public目录下生成sitemap.xml和baidusitemap.xml。
 ]
]
添加爬虫协议
在站点source文件夹下新建robots.txt文件,文件内容如下:
User-agent: *
Allow: /
Allow:/archives/
Allow:/categories/
Allow:/tags/
Allow:/resources/
Disallow:/vendors/
Disallow:/js/
Disallow:/css/
Disallow:/fonts/
Disallow:/vendors/
Disallow:/fancybox/

Sitemap:https://blog.fightingtop.cn/sitemap.xml
Sitemap:https://blog.fightingtop.cn/baidusitemap.xml
Allow字段的值即为允许搜索引擎爬区的内容,可以对应到主题配置文件中的menu目录配置,如果菜单栏还有其他选项都可以按照格式自行添加。
需要将https://blog.fightingtop.cn改成自己的域名。
提交资源到 Google
打开Google Search Console,填写博客地址。

站点验证
Google给出的推荐方法是上传HTML文件,但是不知道为什么一直验证失败,所以我选择了备用方法中的HTML 标记,

将给出的元标记复制到\themes\hexo-theme-next\layout\_partials\head.swig文件中。添加后运行hexo d -g将改动提交。稍后就可以验证成功了。
your-hexo-site\themes\hexo-theme-next\layout\_partials\head.swig
<metacharset="UTF-8"/>
<metahttp-equiv="X-UA-Compatible"content="IE=edge" />
<metaname="viewport"content="width=device-width, initial-scale=1, maximum-scale=1"/>
<metaname="theme-color"content="{{ theme.android_chrome_color }}">
<metaname="google-site-verification"content="xxxxxxxxxxxxx" />
<metaname="baidu-site-verification"content="xxxxxxxxx" />
该方法是通过校验网页中<head>中的属性来进行校验的。
<html>
<head>
<metaname="google-site-verification"content="S2s6Oge-PuQt56EBO4t90FLwhL0P0faoH08iSNXe8iU" />
<title> 我的标题 </title>
</head>
<body>
        网页内容
</body>
</html>
添加站点地图
点击右上角添加/测试站点地图输入 sitemap.xml 进行测试,测试无误后再提交文件。

Baidu主动提交链接方法
该方法可直接推送.github.io结尾的网页的链接给百度而避免百度无法爬取github中链接的问题。
该方法需要安装hexo插件,参考官方说明Hexo插件之百度自动提交链接。
安装插件
- 在Hexo根目录下,安装本插件:
npm install hexo-baidu-url-submit --save
配置_config.yml
- 配置博客根目录下的_config.yml文件
baidu_url_submit:
  count:3## 比如3,代表提交最新的三个链接
  host:https://blog.fightingtop.cn## 在百度站长平台中注册的域名
  token:your_token## 请注意这是您的秘钥, 请不要发布在公众仓库里!
  path:baidu_urls.txt## 文本文档的地址, 新链接会保存在此文本文档里
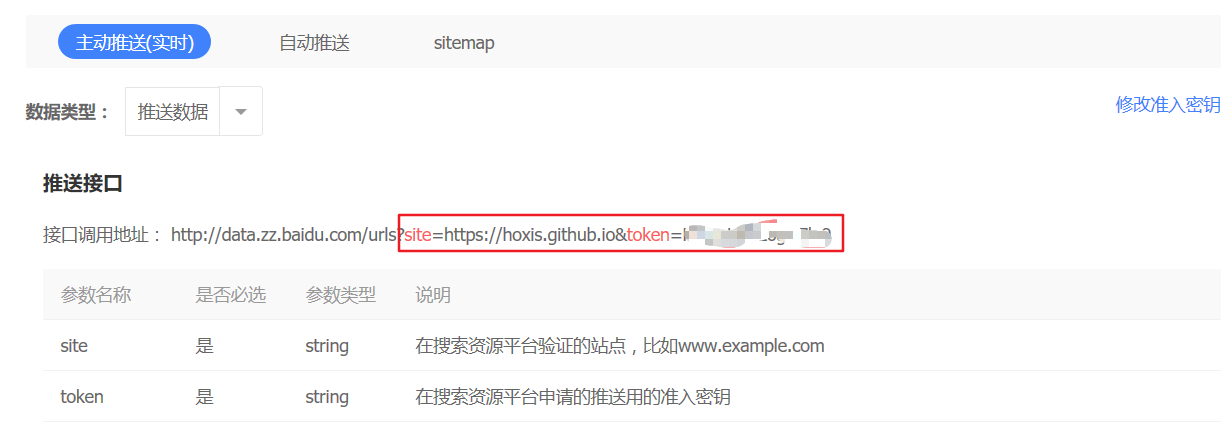
- 检查确认_config.yml中的url值与图片中host后的值一致
    # URL
    ## If your site is put in a subdirectory, set url as'http://yoursite.com/child'and root as'/child/'
    url: https://hoxis.github.io
- 最后修改deploy
添加一段baidu_url_submitter。
deploy:
- type: git
repo: https://github.com/hoxis/hoxis.github.io.git
branch: master

- type: git
repo: https://git.coding.net/hoxis/hoxis.git
branch: master

- type: baidu_url_submitter
推送
之后进行部署后该插件将自动进行主动推送至百度,如图所示表示推送成功。

自身网站结构优化
出站链接添加nofollow标签
网络爬虫会在当前页面搜索所有的链接,然后一个个查看,所以就很有可能跳到别的网站就不回来了。这个时候就需要nofollow起作用了。
`nofollow标签`是由谷歌领头创新的一个`反垃圾链接`的标签,并被百度、yahoo等各大搜索引擎广泛支持,引用nofollow标签的目的是:用于指示搜索引擎不要追踪(即抓取)网页上的带有nofollow属性的任何出站链接,以减少垃圾链接的分散网站权重。
修改footer.swig文件
路径在your-hexo-site\themes\next\layout\_partials,将下面代码中的a标签加上rel="external nofollow"属性。
{{ __('footer.powered', 'Hexo') }}

<arel="external nofollow"class="theme-link"target="_blank"href="https://github.com/iissnan/hexo-theme-next">
修改sidebar.swig文件
路径在your-hexo-site\themes\next\layout_macro,将下面代码中的a标签加上rel="external nofollow"属性;
<ahref="https://creativecommons.org/{% if theme.creative_commons === 'zero' %}publicdomain/zero/1.0{% else %}licenses/{{ theme.creative_commons }}/4.0{% endif %}/"rel="external nofollow"class="cc-opacity"target="_blank">

<ahref="{{ link }}"title="{{ name }}"rel="external nofollow"target="_blank">{{ name }}</a>

<arel="external nofollow"href="{{ link.split('||')[0] | trim }}"target="_blank"title="{{ name }}">
添加关键字
修改模板your-hexo-site\scaffolds\post.md文件,添加keywords和description字段,用于生成的文章中添加关键字和描述。
title: {{ title }}
date: {{ date }}
tags:
keywords:
description:
修改博文链接
HEXO默认的文章链接形式为domain/year/month/day/postname,默认就是一个四级url,并且可能造成url过长,对搜索引擎是十分不友好的,我们可以改成domain/postname 的形式。编辑站点_config.yml文件,修改其中的permalink字段改为permalink: :title.html即可。
#permalink: :year/:month/:day/:title/
permalink: :title.html
首页title优化
更改index.swig文件your-hexo-site\themes\next\layout
将下面这段代码:
{% block title %} {{ config.title }} {% endblock %}


        {% block title %} {{ config.title }} - {{ theme.description }} {% endblock %}
这时候你的首页会更符合网站名称-网站描述这习惯。
进阶,做了seo优化,把关键词也显示在title标题里,可改成
{% block title %} {{ theme.keywords }} - {{ config.title }}{{ theme.description }} {% endblock %}
注意:别堆砌关键字,整个标题一般不超过80个字符,可以通过chinaz的seo综合查询检查。